In this tutorial we’ll create a simple banner with light animation. If you are new to Photoshop, follow along and you might learn a thing or two. If you are here just for the animation, you can directly Jump to the animation part.
Let’s start with the background. Choose the Gradient Tool and as your background color use #57f6da (light green) and as your foreground color use #008073 (dark green). Make sure the Linear Gradient is chosen. Draw a direct or angular line from top to bottom.

Next we do the text. On this tutorial I used a basic system font that should be on every computer: Arial. Write the SALE text with 48pt, #feffff, regular Arial. Then AMAZING DESIGNS with 20pt and COME AND EXPLORE with 14pt. You of course can use whatever font, size and text you want.
Under the SALE text, draw a straight line by holding the Shift key. To give it some style set the fill to none and stroke to #feffff. Set the stroke size to 2pt and height to 2pt as well and choose the dotted line.
To create the button, choose the Rounded Rectangle Tool and set the radius to: 5px. Go to layer style and give the button a gradient: #ef2a7a (darker pink) and #f93e8a (lighter pink).
Time to create the down arrow. Pick the Rectangle Tool and hold shift white drawing. Next rotate the rectangle by 45 degrees. To do this press ctrl/cmd + t and enter 45 to the rotation field.

We need to draw another rectangle to cut the 1st rectangle in half, so first choose Combine Shapes and draw your second rectangle on top of the first, like on the image below. By using the Direct Select Tool (the black arrow) you can select the rectangles separately and move them around and once you have them in place choose Subtract From Shape. Now you are left with an arrow pointing down. The arrow is still a vector and you can resize it as you want. Name the layer Arrow 1.

Once we got our 1st layer of the gif banner the way we want it to be, we are going to save it as .jpg. Next we do the necessary changes for the second layer of the gif. You could change the text etc. but I decided to work the arrow and button. I’m going to duplicate the arrow and name it arrow 2 and hide the arrow 1. Nudge the arrow 2 down few pixels. Then choose the button and go to layer style and give it some Outer Glow, settings I used – Opacity 45%, Spread: 35% and Size: 4px. Now we got our second layer of the animated gif ready. Save it as .jpe and close the banner file.
The animation
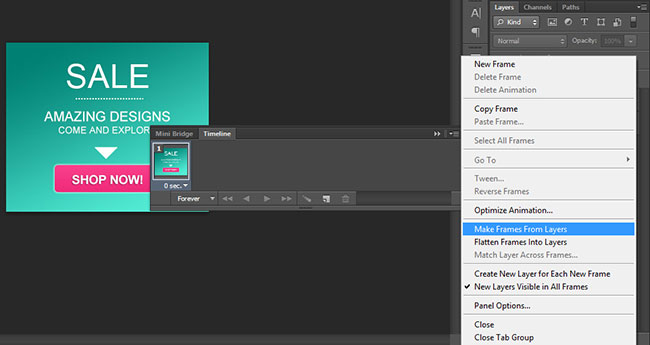
Choose the 2 jpes you created and open them in Photoshop. Copy the second jpg and bring it over (ctrl/cmd + c) to the first jpg file. Go to Window -> Timeline and click on the arrow down icon and choose Make Frames From Layers.

Set the time for each layer to 1sec. When you click on the text Forever you can set the loop count for your animation and determine how many times your animation will repeat. On the timeline window you can also preview your banner by clicking the Play button.

To save you banner go to File -> Save for Web. On this window choose from the Preset: GIF 128 Dithered and to have the gradient smooth, crank the Dither percentage all the way to 100%. I also set the Colors to 256. That’s it, your banner is ready.


2 responses to “Create an Animated Banner Ad with Photoshop”
Thanks for the step by step guide.
Lovely, tutorial that I ever found for banner ad design with photoshop. Thanks, mate!!